Cookie Butter Cheesecake Cups
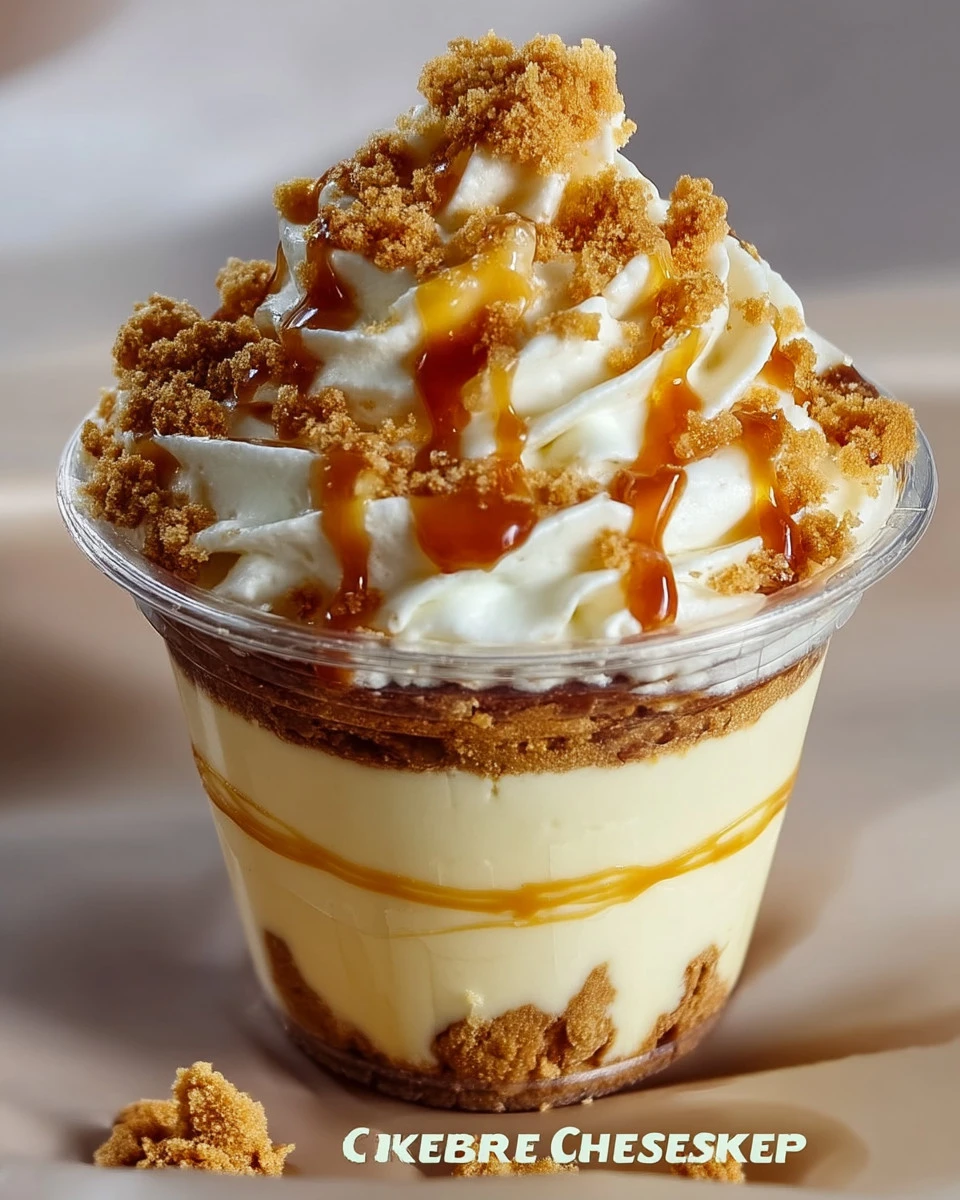
Cookie Butter Cheesecake Cups
Cookie Butter Cheesecake Cups are the perfect dessert for any occasion. They combine the rich flavors of cheesecake with the unique taste of cookie butter, creating a delightful treat that everyone will love. These cups are easy to make and are sure to impress your family and friends. With a crunchy cookie base and creamy filling, they offer a little bit of everything in each bite.
Why Make This Recipe
Making Cookie Butter Cheesecake Cups is a great way to enjoy a delicious dessert without a lot of fuss. They are simple to prepare and do not require baking, which means you can whip them up quickly. They are also perfect for gatherings and parties, as they are served in individual cups. Plus, the combination of cream cheese and cookie butter makes for a heavenly flavor that is hard to resist.
How to Make Cookie Butter Cheesecake Cups
To create these delightful cups, follow the steps outlined below. It’s a fun and straightforward process that anyone can try, even if you’re not an experienced baker.
Ingredients
- 8 oz cream cheese, softened
- 1/2 cup powdered sugar
- 1/2 cup cookie butter (Biscoff spread)
- 1 tsp vanilla extract
- 1/2 cup heavy whipping cream
- 1 cup crushed Biscoff cookies
- 2 tbsp melted butter
- Caramel sauce (for drizzling)
- Whole & crushed Biscoff cookies
- Whipped cream
Directions
-
Prepare the Cookie Layer: Start by crushing the Biscoff cookies. Mix them with melted butter until combined. Divide the mixture evenly between small serving cups and press it firmly into the bottom of each cup to form the base.
-
Make the Cheesecake Filling: In a large bowl, beat together the softened cream cheese, powdered sugar, cookie butter, and vanilla extract until the mixture is nice and smooth. In another bowl, whip the heavy cream until stiff peaks form. Gently fold the whipped cream into the cookie butter mixture until it is light and fluffy.
-
Assemble the Cheesecake Cups: Spoon or pipe the cheesecake filling over the cookie base in each cup. Drizzle caramel sauce on top and sprinkle some crushed cookies between layers. If you want, you can repeat these layers for a more indulgent cup.
-
Garnish & Serve: Finish off the cups by topping them with whipped cream, a whole Biscoff cookie, and a drizzle of extra caramel sauce. For the best texture, chill them in the fridge for about 30 minutes before serving.
How to Serve Cookie Butter Cheesecake Cups
These cups are perfect as a sweet ending to a meal or as a fun dessert at parties. You can serve them right out of the fridge after chilling them for a bit. They can be accompanied by a small spoon or left as is for easy eating.
How to Store Cookie Butter Cheesecake Cups
If you have leftovers, store the cups in an airtight container in the fridge. They will stay fresh for about 3 days. You can also make them a day in advance, which makes them perfect for meal prep or gatherings.
Tips to Make Cookie Butter Cheesecake Cups
- Make sure your cream cheese is softened for easier mixing.
- When whipping the cream, be careful not to overwhip it, or it might become grainy.
- Feel free to adjust the amount of cookie butter to your taste.
Variation
You can customize these cheesecake cups by adding different toppings like chocolate sauce, nuts, or fresh fruits. You can also try using other types of cookie spreads if you want to explore different flavors.
FAQs
1. Can I use regular cookies instead of Biscoff cookies?
Yes, you can substitute Biscoff cookies with other types of cookies, but the flavor will be different.
2. Do I need to bake these cheesecake cups?
No, this recipe does not require baking. You simply mix, layer, and chill.
3. How long can I keep these cheesecake cups?
You can store them in the refrigerator for up to 3 days. They’re best enjoyed fresh but will hold up well for a short period.
If you’re looking for a simple yet delicious treat, these Cookie Butter Cheesecake Cups are just what you need! Enjoy making and sharing them!