Tiramisu Ice Cream Cake
Tiramisu Ice Cream Cake
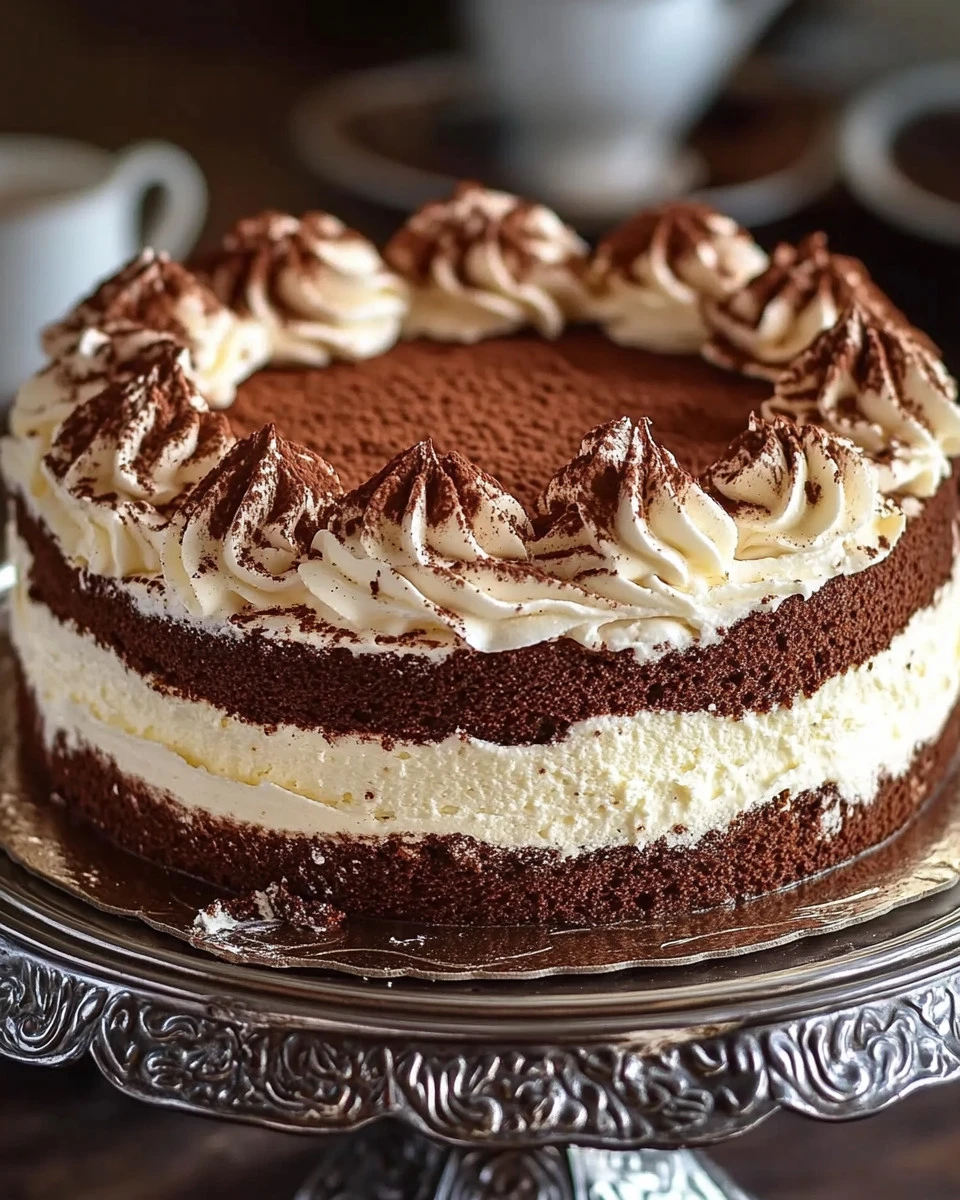
If you love the classic Italian dessert, you’ll fall head over heels for this Tiramisu Ice Cream Cake. Imagine the creamy texture of tiramisu combined with the refreshing chill of ice cream — it’s a match made in dessert heaven! Perfect for hot summer days or any special occasion, this cake is both delicious and easy to prepare.
Why Make This Recipe
There are countless reasons to make this Tiramisu Ice Cream Cake! First, it’s a no-bake dessert, which is a major bonus when you want to avoid turning on the oven. This dessert is also versatile. You can customize it to your taste or dietary preferences. Plus, it’s a crowd-pleaser! Whether you are serving it at a family gathering or a birthday party, everyone will love the delicious layers of coffee, ice cream, and ladyfingers.
How to Make Tiramisu Ice Cream Cake
Ingredients:
- 1 pint (2 cups) vanilla or mascarpone-flavored ice cream (softened)
- 1 pint (2 cups) coffee ice cream (softened)
- 20–24 ladyfinger cookies (savoiardi)
- 1/2 cup strong brewed coffee (cooled)
- 2 tbsp coffee liqueur or espresso (optional)
- 2 tbsp cocoa powder
- 1/4 cup mini chocolate chips or chocolate shavings (optional)
- Whipped cream, for topping
Directions:
- In a shallow bowl, mix the brewed coffee with the optional coffee liqueur. Quickly dip each ladyfinger into the coffee mixture, but don’t soak them too long.
- Line a loaf pan or springform pan with parchment or plastic wrap.
- Layer the dipped ladyfingers on the bottom of the pan.
- Spread the softened coffee ice cream over the ladyfingers and smooth it out.
- Add another layer of dipped ladyfingers on top.
- Now, spread the softened vanilla or mascarpone ice cream over this layer.
- Dust the top with cocoa powder and sprinkle chocolate chips or shavings for extra flavor.
- Cover the cake and freeze it for at least 4 hours or overnight.
- Before serving, let the cake sit at room temperature for about 10 minutes to soften slightly.
- Slice the cake and serve with whipped cream and a little extra cocoa powder if you like.
How to Serve Tiramisu Ice Cream Cake
Serve your Tiramisu Ice Cream Cake cold straight from the freezer. It’s best enjoyed in slices, topped with a little whipped cream and, if you want, some extra cocoa powder. You can even add a sprinkle of grated chocolate for a special touch!
How to Store Tiramisu Ice Cream Cake
Store any leftovers in the freezer. Keep it wrapped tightly in plastic wrap or aluminum foil to prevent freezer burn. It’s best eaten within a week to enjoy the perfect texture.
Tips to Make Tiramisu Ice Cream Cake
- Ensure the ice cream is softened before spreading it; this makes it easier to work with.
- Don’t let ladyfingers soak too long in the coffee; they should be moist but not soggy.
- Feel free to mix up the layers with different flavors of ice cream if you prefer.
Variation
You can twist this recipe by using different flavors of ice cream, like chocolate or strawberry, and various liqueurs. You might also try adding fruit, like sliced strawberries or bananas, between the layers for extra flavor.
FAQs
1. Can I make this cake ahead of time?
Yes! You can prepare it a day or two in advance and freeze it. Just allow it to soften a bit before serving.
2. Can I use a different type of cookie instead of ladyfingers?
Absolutely! Any cookie that can hold together when dipped in coffee can work, such as sponge cake or graham crackers.
3. Is there a non-alcoholic version?
Yes! Simply skip the coffee liqueur, and you’ll still have a delicious dessert. The coffee flavor alone is fantastic.
Tiramisu Ice Cream Cake
Ingredients
Ice Cream Layers
- 2 cups vanilla or mascarpone-flavored ice cream (softened) Ensure the ice cream is softened for easy spreading.
- 2 cups coffee ice cream (softened) Ensure the ice cream is softened for easy spreading.
Layering Components
- 20-24 pieces ladyfinger cookies (savoiardi) Quickly dip in coffee mixture, do not soak too long.
- 1/2 cup strong brewed coffee (cooled) This will be used to dip the ladyfingers.
- 2 tbsp coffee liqueur or espresso (optional) Adds extra flavor, can be omitted for non-alcoholic version.
- 2 tbsp cocoa powder For dusting on top before serving.
- 1/4 cup mini chocolate chips or chocolate shavings (optional) For additional flavor and decoration.
- as needed Whipped cream For topping when serving.
Instructions
Preparation
- In a shallow bowl, mix the brewed coffee with the optional coffee liqueur.
- Quickly dip each ladyfinger into the coffee mixture, but don’t soak them too long.
- Line a loaf pan or springform pan with parchment or plastic wrap.
- Layer the dipped ladyfingers on the bottom of the pan.
Layering
- Spread the softened coffee ice cream over the ladyfingers and smooth it out.
- Add another layer of dipped ladyfingers on top.
- Spread the softened vanilla or mascarpone ice cream over this layer.
- Dust the top with cocoa powder and sprinkle chocolate chips or shavings.
Freezing
- Cover the cake and freeze it for at least 4 hours or overnight.
Serving
- Before serving, let the cake sit at room temperature for about 10 minutes to soften slightly.
- Slice the cake and serve with whipped cream and extra cocoa powder if desired.